Introduction Integrating security into a widely used platform like GitHub is both a challenge and an opportunity to enhance its...
4 April 2024
Lire cet article en Français
Scheduled Pipelines: Schedule and Automate Your Deployment Workflows

Over 4 million organizations have chosen GitHub to host their projects. It seems the logical choice when you consider all the advantages and services offered by this software factory.
These services typically include continuous integration (CI) and continuous deployment (CD).
CI/CD workflows can be easily implemented in the best-known software factories: GitHub, GitLab, and Azure DevOps.
In this post, we’ll look at how to schedule deployments on each of these platforms.
Context
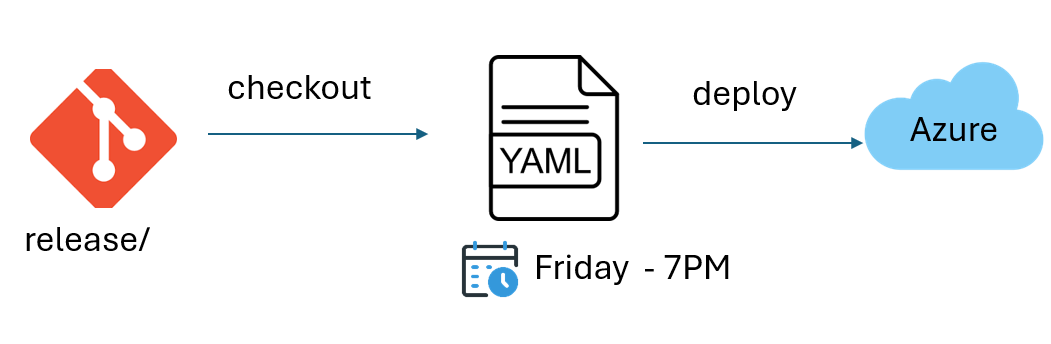
To illustrate how scheduled pipelines are used, let’s consider the following scenario: a company wants to deploy the latest version of its API in production every Friday starting at 7 p.m.
The source code for the latest API release can be found on the GIT release branch.
Prerequisites for Scheduling a Pipeline
To schedule a pipeline, we need to look at cron expressions.
Definition: a cron expression is a character string with a set of fields that describe a schedule.
Format: {minute} {hour} {day of the month} {month} {day of the week}
For our scenario, we’ll use the following cron expression to describe the run frequency of our pipeline:
0: minute
19: hour (7 p.m.)
*: day of the month
*: month
5: day of the week (Friday)
We strongly recommend using crontab.guru to view and verify the expression defined in the cron.
Azure DevOps – Pipelines
Once you’ve logged in to your organization’s Azure DevOps portal, you need to choose the project you want to work on.
From the project page, you can then create a pipeline from the “Pipelines” tab.
To get started, select “Azure Repos Git.”
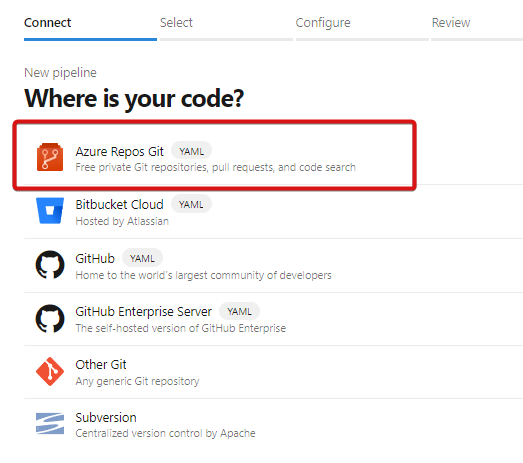
Next, choose the project that will host the pipeline:

You can then choose to create a new pipeline or select a pipeline already created in the Git repository.
⚠️ Make sure the YAML file describing the pipeline is created or modified from the branch targeted by the scheduled task. In our case, the file must be created on the “release” branch.

Finally, click on “Save and run” to save the pipeline.
Note: the “always: true” parameter guarantees that the pipeline will run even if no code changes have been detected on the release branch.
Checking the scheduled pipeline
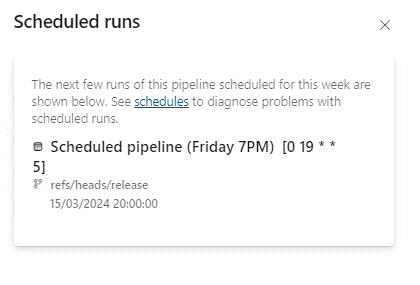
From the Azure DevOps portal, you can check the next scheduled occurrences of a pipeline.
Start by opening the pipeline from the Pipelines tab.
The list can be found in the “Scheduled runs” tab in the menu at the top right.

Scheduled pipeline limitations on Azure DevOps
The scheduled pipeline limitations on Azure DevOps are as follows:
- About 1000 runs per week
- 10 runs per pipeline every 15 minutes
- The time zone used in Azure DevOps is UTC
Pipeline classic mode
In Azure DevOps, you can use classic mode when creating a pipeline (see Microsoft documentation). We won’t going over this mode in this post, but we do want to point out that classic mode allows you to choose the time zone, unlike YAML mode.
Scheduling Deployments on GitHub Actions
From GitHub, you can select the Git repository on which to schedule a deployment.
From the “Actions” menu, you have access to all the pipelines (“workflows”) linked to the depot.
You can create a new pipeline by clicking on the “New workflow” button.
If a pipeline already exists, it will appear in the Workflows list.

Unlike Azure DevOps, on GitHub, the scheduled pipeline must be created on the main branch, not on the target branch.
Checking the scheduled pipeline
GitHub doesn’t have a menu showing the next scheduled occurrences of a pipeline. You can only check the results of past runs and filter by “schedule” event type.

Scheduled pipeline limitations on GitHub
The scheduled pipeline limitations on GitHub are as follows (source: GitHub documentation):
- The minimum interval between two scheduled runs is 5 minutes.
- During busy periods on the GitHub Actions side, scheduled tasks may end up delayed or even abandoned.
- If the repository is public, the workflow will be disabled if there has been no activity detected in the last 60 days.
- The time zone used in GitHub is UTC.
Scheduling Deployments on GitLab
From GitLab, you can select the Git repository on which to schedule a deployment.
On GitLab, the pipeline and its scheduler are separate.
You can edit the deployment script from the Build menu by selecting “Pipeline editor.”

The scheduler can only be edited from “Pipeline schedules.” Unlike Azure DevOps and GitHub, the GitLab scheduler cannot be described directly in the yaml file.
You can create a scheduled task by clicking on “New Schedule.”
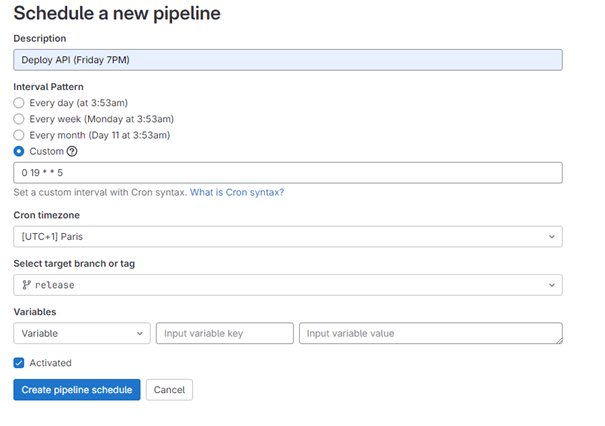
GitLab is the only software factory that takes time zone into account in the pipeline schedule.
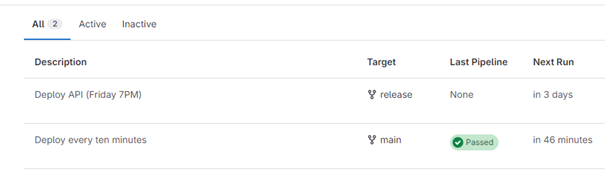
Checking the scheduled pipeline
The pipeline’s execution traces and upcoming occurrences can be found on the Pipeline Schedules page.
Scheduled pipeline limitations on GitLab
The scheduled pipeline limitations on GitLab are as follows (source: GitLab documentation):
- The minimum interval between two scheduled runs is 5 minutes.
Free tier:
- A maximum of 10 projects can contain a scheduled pipeline
- A scheduled pipeline can run a maximum of 24 times per day
Paid subscription
- A maximum of 50 projects can contain a scheduled pipeline
- A scheduled pipeline can run a maximum of 288 times per day
Note: the limitations indicated by GitLab aren’t really complete. The limitation to 24 times/day is actually a limitation to 1 time/hour each day (see the screenshot above).
Scheduled Pipelines: Key Takeaways
In this post, we looked at how to schedule pipeline execution from Azure DevOps, GitHub, and GitLab.
Each of these software factories offers a simple solution for setting up scheduled pipelines, and each has a few limitations.
Here are a few examples of situations that can benefit from scheduled pipelines:
- Deploying a new API version on Azure every Friday
- Launching a nightly build and series of unit tests on projects between midnight and 5 a.m.
- Setting up a Sandbox environment on Azure and deleting it at the end of the day using Terraform
Do you need help with your digital transformation projects? Contact us!