

Introduction Integrating security into a widely used platform like GitHub is both a challenge and an opportunity to enhance its...
3 November 2022
Lire cet article en Français
Secure access to Swagger UI with Azure Active Directory

Today we will show in this article how we could secure access to Swagger interfaces for ASP.NET Core applications with Azure Active Directory.
Security is one of the major keys that can determine how compliant the solution is. The first intuition, when we talk about security for ASP.NET Web API, is adding authentication and authorization to call endpoints. But today we will handle a custom security need. In most of ASP.NET Web API applications, we make Swagger integration to facilitate communication with different endpoints. But let’s imagine that our application will go to production, in this case we need to think about security for Swagger UI, so to do that we have almost two options:
- Enable Swagger only for development environments
- Add access constraint for Swagger
The first option is the easiest one but it will completely disable the Swagger feature. So our focus today is on the second one.
To do that, we have several tips:
- Enable access by static (or predefined) login/password
- Enable access for limited IP addresses
- Enable access based on authentication provider
As you can see the first two options are not dynamic since they are using some static data to authenticate access. However, the third one is more advanced and gives us more flexibility to handle which one is able to explore Swagger in a production environment. We will apply this option with Azure Active Directory based on three main steps:
- Configure an Azure App Registration
- Register an authentication component in the application
- Add a middleware to handle the access to Swagger UI
So let’s start.
Pre-requests
- An existing ASP.NET Web API project (.NET 5)
- Swagger is already integrated in your solution (Swashbuckle or NSwag)
- An existing Azure Active Directory
Configure Azure App Registration
We can consider the Azure App Registration as an ambassador of our ASP.NET application to determine if the current user is authenticated in the Azure Active Directory or not. To configure the App Registration you need to:
- Log in on Azure Portal https://portal.azure.com/
- On the top search bar, type “Azure Active Directory”
- On the left menu of Azure Active Directory overview page click on App registrations

- On the top left corner, click on “New registration”. You need to fill the form of app registration creation
- Fill in the name of the app (e.g: swagger-ui-auth)
- In the “Who can use this application or access this API” section click on “Accounts in this organizational directory only”
- In the “Redirect Uri” section, put the uri where your application will redirect after completing authentication (this uri is responsible to get authentication response). Select “Web” in the platform dropdown and put the uri in this format “{your_base_application_uri}/signin-oidc-swagger”. Please find here uri restrictions.
- The form should look like that at the end. Then click Register

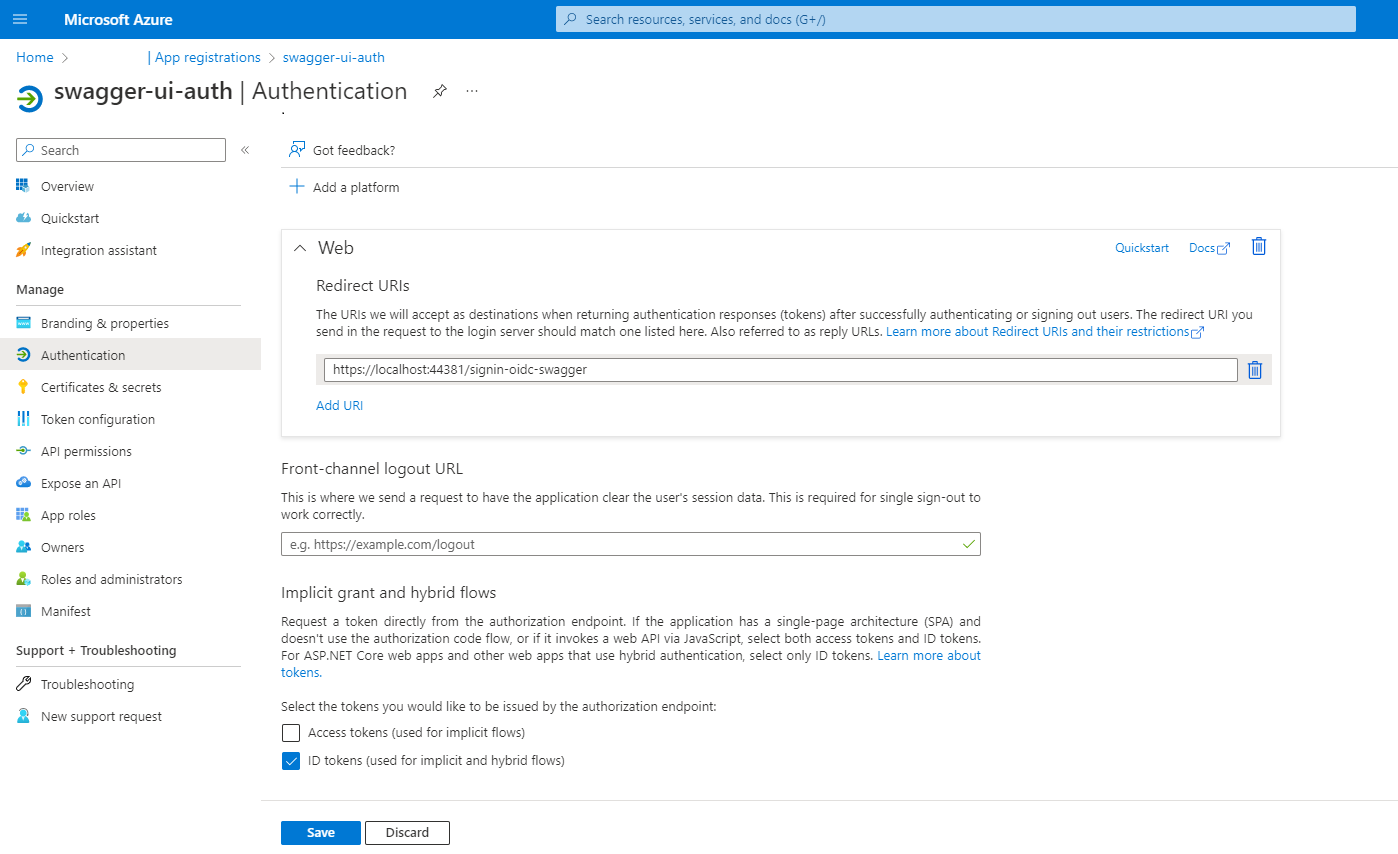
- Once the app registration is created, we will configure which kind of request will be sent to redirect uri after authentication is completed.
- On the left menu of the app registration overview page, click on

-
- In the “Implicit grant and hybrid flows” section select “ID tokens” as recommended by Microsoft “For ASP.NET Core web apps and other web apps that use hybrid authentication, select only ID tokens”. When selecting this option, you will have in the request payload to redirect uri (previously configured) a property called “id_token” that will be used to verify if the user is authenticated or not under the Azure Active Directory.
- The form should look like that. Then click Save.
Congratulations, you have now completed the app registration configuration. Let’s move to the next step.
Register an authentication component in the application
In the application, we need to register an authentication component that could communicate with the app registration previously created and configured. We will use the Microsoft Identity Web authentication. It’s an abstraction layer for OpenIdConnect that provides a single-surface API convenience layer that ties together ASP.NET Core, its authentication middleware, and the Microsoft authentication library for .NET.
To do so, we need to:
- Add a new configuration section in the appsettings.json.
"AzureAd": {
     "Instance": "https://login.microsoftonline.com/",
     "TenantId": "see below",
     "SwaggerUiGetwayClientId": "see below",
     "SwaggerUiGetwaySecret": "see below",
     "SwaggerOpenIdSignInCallBack": "/signin-oidc-swagger"
}
-
- You can find TenantId in the app registration overview page, it corresponds to Directory (tenant) ID.
- You can find SwaggerUiGetwayClientId in the app registration overview page as well, it corresponds to Application (client) ID.

-
- To find SwaggerUiGetwaySecret, you need to go to “Certificates & secrets” section. Go to the “Client secrets” tab and create a new client secret. Fill in the form and click “Save”. Copy the value of this secret (IMPORTANT: copy the value and not the secret id) and put it for SwaggerUiGetwaySecret.

- Install the nuget package Microsoft.Identity.Web in your application.
- In ConfigureServices method in your Startup class, add this block of code
As you can we use the configuration section that we previously added in the appsettings.json.
Middleware to handle the access to Swagger UI
This is the most tricky and important step, so let’s see together how to do that. Create a middleware class called SwaggerOAuthMiddleware. This is how it should be:
Then you need to call this middleware in Configure method in the Startup class by adding this line of code:
app.UseMiddleware<SwaggerOAuthMiddleware>(configuration);
Before deep diving into the code details, you need to know what happens exactly when you load the Swagger page of your API.
- Check if you are authenticated to access the Swagger UI
- If you are not, you will be redirected to Microsoft login page where you need to fill your credentials to generate a token
- If you succeed to authenticate, you will be redirected to the link that you previously configured on Azure portal. Here there will be a POST http request that will contain authentication result data (most important one is id_token)
- Swagger will start loading all required resources in order to display the final view where you could explore all your endpoints.

Loading those resources is achieved through some endpoints where they start as well by ‘swagger’ word, and those endpoints are automatically added as internal endpoints for your solution as a result of the Swagger integration.
Let’s go back to our code now.
So if the requested endpoint is neither Swagger UI (start with ‘/swagger’) nor authentication callback (start with ‘/signin-oidc-swagger’) there is no access checking and the context will continue executing.
If the requested endpoint is a Swagger UI endpoint, so we need to check if the user is authenticated or not by calling the IsValidIdToken method (we will explain later the behavior of this method) by passing the stored token in the session storage (we will explain later why extracting token from session storage when calling a Swagger UI endpoint). If the user is authenticated the context will continue executing if not the authentication is challenged (redirection to Microsoft login component).
If the requested endpoint is the authentication callback uri (the redirection after completing authentication), we need to check if the user is successfully authenticated to access Swagger UI or not by validating the id token provided in the POST payload request. To do that we need to call GetIdTokenFromSignInCallBackRequest method by using the StreamReader to extract content from context request.

Normally, validating the id token does not present a complete authentication flow, but to simplify the process we could stop at the id token without requesting and validating the token using the id token. The reason behind that is that if you have a valid id token you could generate a valid token.
Once the id token is valid we need to store it in the session storage for two main reasons:
- After redirection to callback uri and successful authentication validation, there will be a series of Swagger resources loading, as mentioned above, by calling some endpoints starting with ‘/swagger’ so the first If Condition in the middleware class is filled. So if we don’t have a token stored somewhere the user will be considered as non authenticated and the process will start from the beginning and as result we will face an infinity loop.
- To avoid any latency if a user wants to open the Swagger UI (previously loaded in a first tab) in other browser tabs.
To enable session storage you need to add Distributed Memory Cache and Session to services collection. So you need to add this block of code in ConfigureServices method in Startup class
As you can see, the id token validation is done through the IsValidIdToken method. It uses JwtSecurityTokenHandler to validate mainly :
- Audience: validate client id of the Azure app registration
- Issuer: validate the tenant id (the Azure Active Directory) in which the app registration is created
- SingingKeys: they are obtained using OpenId Connect Configuration from the “{instance}{tenantId}/v2.0/.well-known/openid-configuration” endpoint
Launch your app and enjoy exploring Swagger UI safely.


Nice, this helped me.