Developed by GitHub and OpenAI, professionals are calling GitHub Copilot a “revolutionary tool for developers,” since it combines Artificial Intelligence...
20 February 2024
Lire cet article en Français
How To Develop A Custom Voice? Feedback from an expert
Custom Neural Voice (CNV) is a component of Azure Cognitive Services that allows you to generate a personalized, synthetic voice for your applications. It is a text-to-speech tool that helps you create a voice that sounds very natural for your brand or characters by using samples of human speech as training material.
I recently completed a project where I developed a custom voice, and I encountered certain features and unexpected issues that the official documentation doesn’t address. That’s why I want to share some practical advice and insights in this article.
While the theoretical aspect is comprehensively covered in existing resources, the suggestions in this post are mainly drawn from my own experience. I hope you will find them helpful. Let’s get started!
Audio Recording
First, it’s important to create a well-balanced script. It’s more important to ensure the right mix of sentence types than to make the training set exactly match the target domain. A good dataset typically includes:
- Statement sentences: 70-80%
- Questions: 10-20%, with an equal number of rising and falling intonations (rising intonation is used for yes/no questions, while falling intonation is common in wh-questions)
- Exclamation sentences: 10-20%
- Short words/phrases: 10%
You can use this guide to build your dataset. Label statement sentences with 00, questions with 01, and exclamations with 02.
It’s crucial to understand that your training set doesn’t need to match the target text exactly. What’s more important is ensuring the training set is as varied as possible. For example, if you anticipate that the voice talent will need to say unique city names with uncommon pronunciations, such as Truchtersheim, Kingersheim, or Pfaffenhofen (which are lovely towns in Alsace, France), you don’t need to include these in your training set. Instead, consider tweaking your SSML later on. Just a few examples won’t teach your model the correct pronunciation, and you could lose performance if your dataset lacks a sufficient number of exclamations or short phrases.
Next, having a monitor in the recording room is very helpful. If you don’t have one, print three copies of your script: one for you, one for the voice talent, and one for the sound engineer (unless that’s you). The best layout is a Word table with three columns: number, utterance, and status (for tracking completed phrases). Alternating shaded rows or columns in the table will help with navigation.
Finally, I recommend recording all utterances in one go with regular breaks, instead of saving the recordings in parts. My experience has shown that saving multiple segments, like 0-100, 100-200, etc., doesn’t improve performance and actually extends the recording time, which is problematic if the voice talent is on a tight schedule. If mistakes occur, don’t edit them out on the spot. Instead, note the timestamp and remove the errors later during pre-processing. A single, large export is preferable because it’s easier to locate any issues with your notes. Ensure you leave long pauses (at least 3 seconds) between utterances, which will facilitate editing during the processing stage.
Sound Editing Software: Adobe Audition vs Audacity
There are several potential solutions available, such as Adobe Audition or Audacity.
Here’s a structured comparison of the two:
Purpose and Audience:
- Audacity:
- It is a free, open-source audio editing program.
- Ideal for beginners, hobbyists, and those needing simple audio editing tasks.
- Well-suited for podcasters, musicians, and educators on a budget.
- Adobe Audition:
- It is a professional audio workstation for mixing, finishing, and precision editing.
- Aimed at professionals in the field of audio production, including sound engineers, podcasters, and video editors.
- Beneficial for users who require advanced features and integration with other Adobe Creative Cloud applications.
User Interface:
- Audacity:
- Has a simple, user-friendly interface.
- Some may find the design a bit outdated.
- Straightforward layout, making it easy for beginners to navigate.
- Adobe Audition:
- Modern, sleek interface that is customizable.
- Steeper learning curve due to its professional-grade features.
- Offers a more sophisticated workspace that can be tailored to the user’s needs.
Features:
- Audacity:
- Provides basic audio editing tools like cut, copy, paste, and delete.
- Supports multitrack audio and batch processing.
- Offers a range of effects and can be extended with plugins.
- Limited support for advanced effects and no built-in MIDI support.
- Adobe Audition:
- Includes a comprehensive toolset with advanced editing, mixing, and sound restoration features.
- Offers multitrack, waveform, and spectral display.
- Robust noise reduction and audio clean-up tools.
- Integrated with other Adobe applications and services.
Audio Quality and File Formats:
- Audacity:
- Handles up to 32-bit/384kHz audio.
- Supports a wide range of file formats including WAV, AIFF, MP3, and OGG.
- Adobe Audition:
- Also supports high-resolution audio up to 32-bit/192kHz.
- Can handle more file formats and provides better format compatibility for professional use.
Price:
- Audacity:
- Completely free to download and use.
- No subscription or purchase necessary.
- Adobe Audition:
- Available through a subscription-based model as part of Adobe Creative Cloud.
- Monthly or annual subscription fees apply.
- Offers a free trial but requires payment for continued use.
Support and Resources:
- Audacity:
- Being open-source, it has a community-driven support system.
- Users can access forums, user manuals, and FAQs for help.
- Adobe Audition:
- Professional support provided by Adobe.
- Access to a wealth of tutorials, guides, and a dedicated support team.
Audacity or Adobe Audition: My Recommendation
I recommend Audacity, not just because it is free while the former is paid. Audacity provides a more streamlined set of features, which is ideal for our needs since we only require the ability to select a segment, export it, and trim it. Simplicity is often the key to success. In addition, navigating through tracks is more straightforward in Audacity, and you can hide any toolboxes you don’t need.
Furthermore, the File Menu in Audacity includes options for creating, opening, and saving Audacity projects, as well as importing and exporting audio files. For example, the export function doesn’t have a default shortcut, allowing you to set one up for quick access, which significantly speeds up your workflow. I have used both Adobe Audition and Audacity, and I found that with Audacity, I completed my tasks in 2 working days as opposed to the 4 days it took with Adobe Audition, while working with the same volume of data.

Price Details of a Voice Project
Here’re my project details
- Model type: Neural V5.2022.05
- Engine version: 2023.01.16.0
- Training hours: 30.48
- Data size: 440 utterances
- Price: $1584.27
The price may vary depending on the engine version and the number of training hours, but at least you have a sample. After completing the training of your model, you have the advantage of upgrading your engine at no additional cost. As of the time of writing this article, the most current version of the engine available is 2024.01.02.0 .
Intake form
It is important to note that access is granted exclusively upon completion of the Intake Form. Prior to submitting all the necessary project information, it is advisable to consult Microsoft’s Responsible AI Standards. This resource will guide you in refining your project description and scenario to align with responsible AI practices.
Audio Preparation
The procedure is relatively simple and can be outlined as follows:
- Begin by creating a notepad document that lists all the utterances along with their corresponding IDs.
- Work through the list systematically, selecting each utterance individually. Export it, then save the file using its unique ID as the filename. Once saved, remove the utterance from the notepad to keep track of your progress.
- Before starting, determine the ideal file size for the utterances to ensure consistency.
- Maintain a consistent zoom level during your work. Avoid zooming in or out once you begin. This consistency will help you become accustomed to the timeline size, enabling you to accurately add the necessary 100-200 milliseconds of silence to each utterance more effortlessly.
Here’s what a well-balanced training set looks like:
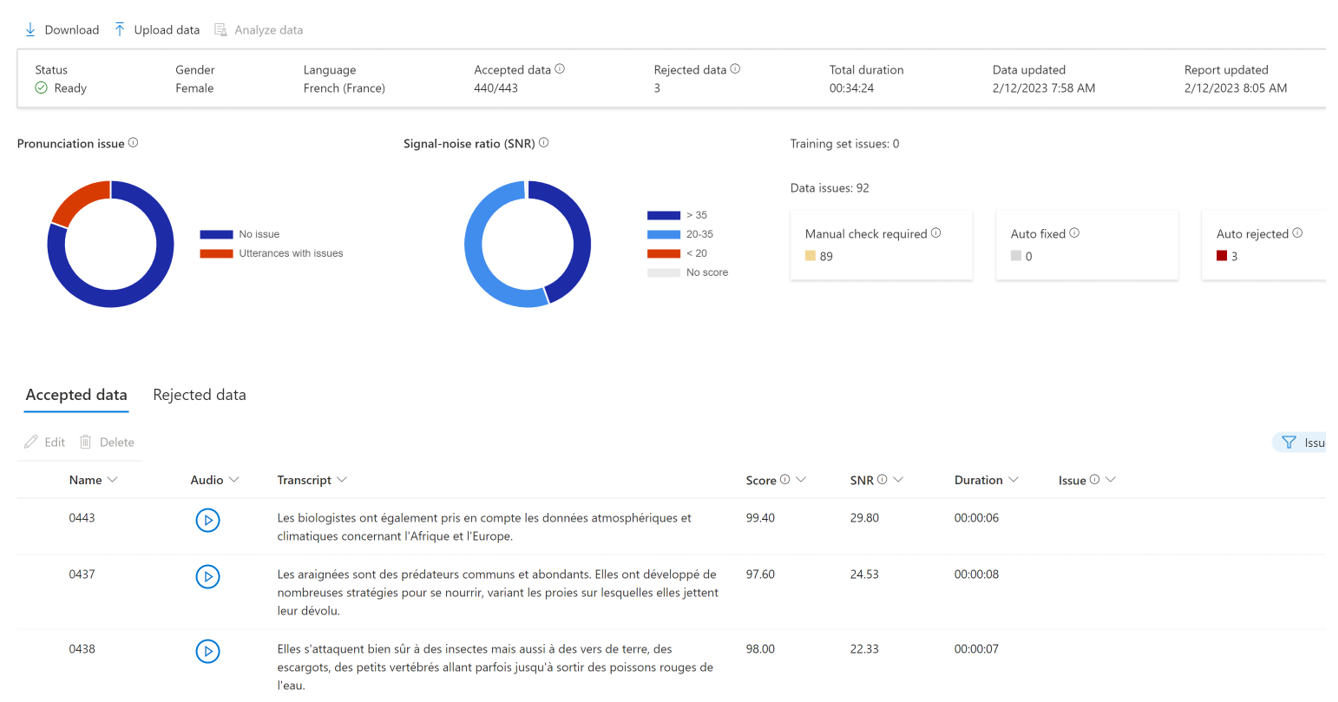
As you see, despite encountering certain technical challenges, the studio is proficient in eliminating any problematic utterances. Each utterance is assigned a quality score, providing a valuable metric for fine-tuning the recording process and assessing the overall data integrity.
Automatic Suspend
Maintaining an endpoint can be costly, which is why some companies choose to have their endpoints operational only during business hours. Instead of handling this process manually, automating it can be more efficient. In my initial project, I considered setting up a Power Automate task to click the suspend button. However, I discovered that there is now a suspend/resume feature accessible via the REST API. For example, you could set up a time-triggered Azure Function that could potentially save you at least 30%. Be aware, though, that while it is possible to integrate custom voice endpoints into your Virtual Networks, the API for suspending/resuming voice models does not currently support Private Endpoints.
Comparison with Azure Personal Voice
You may already be familiar with Azure Personal Voice – a cutting-edge feature that allows for the AI-driven replication of your voice, or that of your application’s users, in mere seconds. By simply providing a one-minute speech sample as the audio prompt, you can harness this technology to generate speech in any of the 90+ supported languages, spanning over 100 locales.
However, this raises the question: Why opt for Azure Custom Neural Voice instead? Despite being the pricier option, requiring more time to train, and demanding a significant amount of effort, there are distinct advantages. Below, we offer a concise comparison of the two services to elucidate their unique benefits.
Personal Voice is aimed at business customers who want to build an app that allows their users to create and use their own personal voice within the app. It has limited use cases, which are outlined in a transparency note, and there’s a plan to support over 1,000 personal voices. The training data for Personal Voice should adhere to a code of conduct, and it requires only one minute of human speech to train. The training process is quick, taking less than five seconds, and the resulting voice quality is described as natural. Personal Voice also supports multilingual capabilities, boasting about 100 languages with automatic language detection enabled. Access to Personal Voice is available via a demo on Speech Studio upon registration, but API access is restricted to eligible customers with approved use cases.
On the other hand, Custom Neural Voice is designed for professional scenarios, such as brand and character voices for chatbots or audio content reading. It too has limited use cases, as noted in the transparency note. Unlike Personal Voice, Customer Neural Voice requires a substantial amount of training data, suggesting the use of a professional studio for recording. It needs between 300-2000 utterances, which translates to about 30 minutes to 3 hours of human speech. The training time is significantly longer, at around 20-40 compute hours, but it produces a highly natural voice quality. Professional Voice also supports multiple languages and requires the selection of the “Neural – cross lingual” feature to train a model that speaks a different language from the training data. However, you can only train and deploy a CNV Pro model after access is approved, which is contingent on eligibility and usage criteria. Access is requested through an intake form.
In summary, Personal Voice offers a quick and easy way to create a natural-sounding voice with just one minute of speech data, ideal for personal use within apps by businesses, while Professional Voice is tailored for more professional, broader-use applications requiring a more extensive dataset and longer training time, offering highly natural voice quality suitable for professional-grade voice needs.
Do you need help with your AI projects? Contact us!